September 2024

The new school year is underway and we want to make sure it’s off to a great start! Reviewing your report cards is a very important step and should be completed during these first few weeks of school. This step involves looking over each grade level’s report cards to make sure all courses, sub-categories, grade scale and layouts look correct. When you complete this step early in the school year, you help support your teachers by making sure they have what they need and reduce last minute report card corrections at the end of the grading period. Please note that report card changes can take up to a week to process.

Here are the steps to view a report card:

  1. Go to ‘Grades’
  2. Choose a homeroom instructor in the ‘select instructor’ drop down then click the ‘view instructor’s grade book’ button
  3. Click the button ‘view report cards’
  4. When the homeroom roster appears, click ‘print’ next to any child’s name

Here are the components to review on a report card:

  • Course names
  • Course subcategories
  • Grade scales/marking codes
  • General formatting, for example school header, course list columns, layout

Click here to read the FAQ on how homeroom teachers can view their report cards!

Click here to read the FAQ on how administrators can view report cards!

Are your schedule codes correct? If a student is marked tardy and has the wrong minutes missing, it is because the schedule code might need to be changed. The schedule codes are used for attendance and is what determines the start and end time for all students.  In other words, when a teacher marks a student tardy, the system needs to know when school starts in order to know how many minutes that student has missed. Schedule codes are assigned to homeroom teachers and feed down into the student’s account. If necessary, there is also the option for the student to have a different code than their homeroom teacher.

Here are the steps for viewing/editing the schedule codes (start/lunch/end times for the school):

  1. Click on Settings
  2. In the left hand menu, click on Monitor
  3. Under the heading ‘Set School Schedule’ click on the link ‘Change School Schedules’
  4. Each schedule code can be edited individually with a change button in the far right column

Please note that schedule codes can not be deleted but if they are no longer needed, make sure to not have them assigned to any homeroom teacher.

To check a homeroom teacher’s schedule code, you will follow these steps:

  1. Go to People, the Staff
  2. Click on the name of a homeroom teacher
  3. In the teacher’s information will be a schedule code selected but if needed you can click on the drop down to see or select one of the other schedule codes

If the school year has already started and the start/lunch/end times are appearing incorrectly for students in Monitor (minutes tardy, etc) then the first thing you will need to do is adjust your schedule codes to reflect the new times. This will make sure that moving forward, all tardies are following the correct times. Then, for any previous day where there were tardies, you will need to mark the student present and then mark them tardy again (to refresh the system).

Did you know that the events a teacher creates in her GradeBook are automatically fed to a student’s assignment calendar?  Assignment Calendars are one of the easiest ways to help strengthen the communication between school and home. Your grade book events are posted automatically, thus requiring no extra work from you! If a teacher creates events before they occur, the students and parents can be better informed and prepared. Here are some advantages to creating events before they occur:

  • Gives students and parents a ‘heads-up’ for the days and weeks ahead
  • Planning your lessons for the week goes hand-in-hand with creating the GradeBook events
  • Attaching files and links to future events can help students and parents prepare for upcoming assignments, tests etc.

For students (and parents on a browser), the assignment calendar can be found on the Home screen underneath their FDmail messages.  There will be a black and white grid showing you all the viewing options available for the child’s grades.  One of the columns is labeled ‘Assignment Calendar’.  Click the ‘View’  button and a new window/tab will appear displaying a month’s worth of dates.  The month can be changed so that the parent or student can see a different range of dates. For parents in the App, the assignment calendar is found under Grades.

FastDirect offers parents three different formats to view or print parent/student directory information (buzz books). The parent/student directory (buzz book)  is a list of the parents and students at the school and specific contact information. The school has the ability to show or hide the directory for parents. If your school is allowing parents to view the directory, then parents can choose to have their home address, home phone number, email address, and cell phone number published to the directory or they can choose to have this information hidden/removed from the directory. Please note – The system will default to having this information published. If would like to have your information withheld from the directories, here are the steps:

  1. Log into your parent account
    1. On the App, click ‘Display Parent Data’ then scroll down to the heading ‘Publish to Directory’ for either the P1 or P2 account
    2. On a internet browser, click ‘View/Edit Parent Information’ at the top of your Home page, then scroll down to the heading ‘Publish to Directory’ for either the P1 or P2 account
  2. Uncheckmark any or all of the directory fields
  3. Click ‘Save Changes’

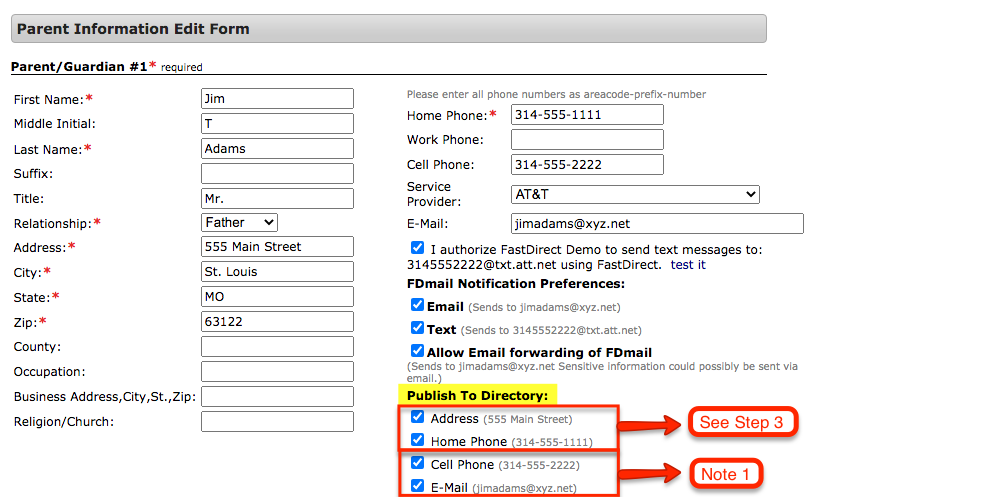
Note 1 – Cell Phone number and Email address Included in Directory:

If your school has allowed for Cell Phone Numbers and Email Addresses to be included in the directory, then parents can also choose to have those hidden/removed as well by following the same steps as those above.

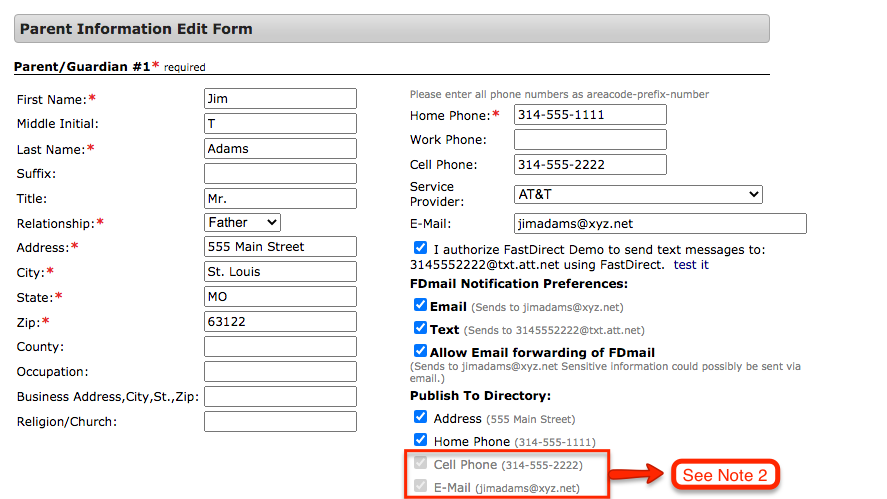
Note 2 – Cell Phone number and Email address NOT Included in Directory:

If your school has chosen to not allow for Cell Phone Numbers and Email Addresses to be included in the directory, then those options will be grayed out. Regardless of if the Cell Phone number and Email address are check marked, as long as they are grayed out then those fields will not be published in the directory. No action is required by the parents.

Viewing

To view the directory, parents will first log into their parent account. For parents using the App, they can click on the ‘Directory’ menu option. For parents using a browser, at the bottom of their Home page will be a box with the heading ‘Directory’ and three viewing options below it.

Watch this video tutorial to find out how to change grading period dates in Report Card Input Controls:

Monthly Mentions Newsletter

Free Training and Tech Support

New to FastDirect Communications? Our newsletter is just one small way we help our schools. Our free training and tech support is a large part of what we offer. Read more!